Share content between books using submodules#
This page reuses CC BY 4.0 licensed content from TeachBooks (2024). Find out more here.
User types
This section is useful for user type 4-5.
Git Workflow
When creating books, you might want to reuse material from other people or from other books you made. In some cases you might even want to have the exact same material into your book. You could do so by manually copying material over. However, whenever the source material is updated, you have to do that again. As an alternative, you can use the underlying git system to refer to the source file directly. This allows you to pick a specific version, or keep the most up-to-date version of it. This pages explains how to do so using ‘git submodules’. However, please consider using our TeachBooks feature with an external toc (in development, more information will follow soon), as it is easier to use.
Adding external content to your book#
If you want to add the repository of an external book to the repository of your book you can do so by importing the other repository using Git Submodules. Your book is then called the parent book. This will basically nest the external repository in the parent repository, and it will appear as if we’ve manually copied the entire repository into the parent repository. I will use this repository as an example parent repository, and I’m going to add parts of an old MUDE book.
First, let’s define the location where the external book should live. Good practice is to put it in book/external to highlight the fact that the content is in fact part of an external book. So the first step is to create the subdirectory book/external/ in your repository. If you’d like to do that with the command line interface (CLI) you can do so as follows:
mkdir -p book/external
Now we can add the external book in this folder. You’ll need to use the CLI for that! (open the CLI by opening Git Bash or click Repository - Open in command prompt in GitHub Desktop):
cd book/external
git submodule add -b <branch> <https-link>
where
<branch>should be the branch you want of the external book/repository. If you only want the default branch, omit the part-b <branch>from the command.<https-link>is the link to the external book/repository, for examplehttps://github.com/tudelft-citg/mude.git.
You can see that the book/external directory now contains a directory with the name of the external repository (MUDE for example), so the result looks equivalent to simply running a git clone inside book/external, however what is important to note here is that the contents of book/external/<external repository> are not part of the parent repository. Instead, book/external/<external repository> is a fully functional Git Repository itself. This means that you can make changes to the external book, from inside the parent book.
If you did not add the submodule with an explicit branch, you can still do this by adding this to the .submodules file that has been created. In our example, we see the lines
[submodule "book/external/MUDE"]
	path = book/external/MUDE
	url = https://github.com/TUDelft-CITG/MUDE
Changes these to
[submodule "book/external/MUDE"]
	path = book/external/MUDE
	url = https://github.com/TUDelft-CITG/MUDE
        branch = <branch>
with again <branch> replaced by the preferred branch.
After the git submodule command, you can make a commit to your parent repositery:
git commit -m "Add external book"
GitHub Desktop will recognize that you’ve created a submodule as indicated by book/external/<external repository>:
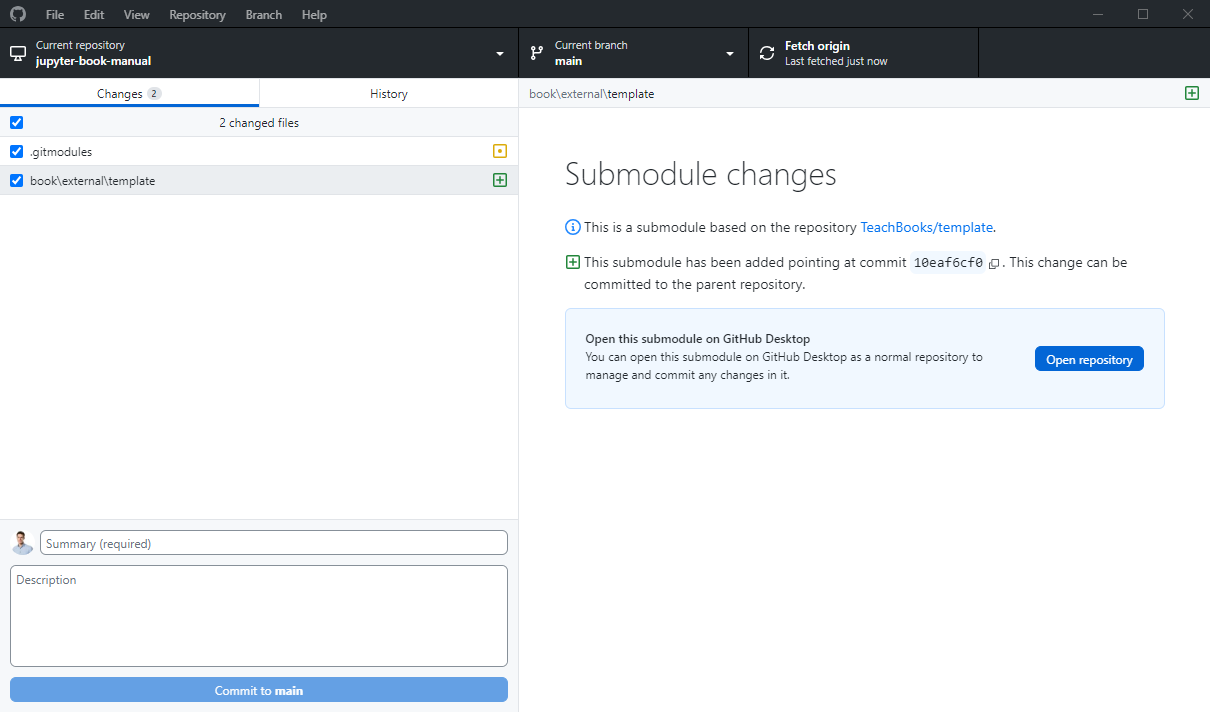
For now, commit both .gitmodules and book\external\<external repository> to your parent repository.
Now, you can add sections of the external book to the table of contents of your parent book (_toc.yml):
chapters:
- file: external/MUDE/book/intro.md
In the above line, I have added the introduction of the MUDE book to my book.
You might want the title of your book page in the table of contents to be different than the title provided as the first header in your nested file. You can adapt the title by specifying it in _toc.yml:
- file: <somefile>
  title: <Some custom title to show in the table of contents>
Editing#
If you want to make an edit to the content of an external repository, which is a submodule of your parent repository (meaning it’s nested), you’ll need to make changes to the external repository so that the parent repository has a commit to point to when ‘updating’ its content. You can do this from within the parent repository! We’ll break down the steps:
1. Navigate to the parent repository
Open your terminal, for example Git Bash or the integrated terminal in VS Code and use the cd command followed by the full path of your parent repository that you have previously cloned to your laptop.
cd /<path>/<parent-repo>
Alternatively, you can locate the submodule in your files, hover your mouse above the path and right click - copy adress as text. Then you can paste the adress in between quotation marks. (This works only on windows)
cd "C:\<path>\<parent-repo>"
Once you are in the right folder, git bash will indicate the branch you are in in blue brackets.
2. Update the submodule
In case someone else has edited the content of the submodule you want to make sure that you ave pulled all recent changes.
git submodule update
3. Navigate to the submodule
cd /<path>/<parent-repo>/external/<submodule>
Or
cd "C:\<path>\<parent-repo>\external\<submodule>"
4. Checkout a new branch (optional)
It is good practice to create a new branch for every set of changes you make to the conent.
git checkout -b <new-branch>
5. Make changes, stage, and commit them in the submodule
Now you can make changes to your file. To open the file in VS Code type:
code <file-name.ext>
Save the file in VS Code and return to the terminal. To stage all changes type:
git add .
If you only want to stage one file type:
git add <file-name.ext>
Next commit the changes:
git commit -m "Commit message"
6. Push the submodule changes to its remote repository
Next you’ll need to push the changes to the external repository. The syntax you need to follow to push is <repository> <branch>. The repository name will most likely be origin which refers to the cloned repository you are in.
git push origin <branch-name>
7. Return to the parent repository
cd /<path>/<parent-repo>
Or
cd "C:\<path>\<parent-repo>"
8. Stage the submodule update in the parent repo and commit
Now we have to ‘update’ the parent repository with the changes pushed to the external repository (submodule). First, stage the submodule update. Then commit the change.
git add book/external/<submodule>
git commit -m "Updated submodule"
9. Push the parent repository changes
Finally push the update to the remote repository.
git push origin <branch-name>
1. Clarifications
It is helpful to make the distinction between the external repository (as a ‘freestanding’ repository) and the nested external repository. In GitHub Desktop you can see the path by hovering above the cloned repository.

Fig. 95 External Repository#
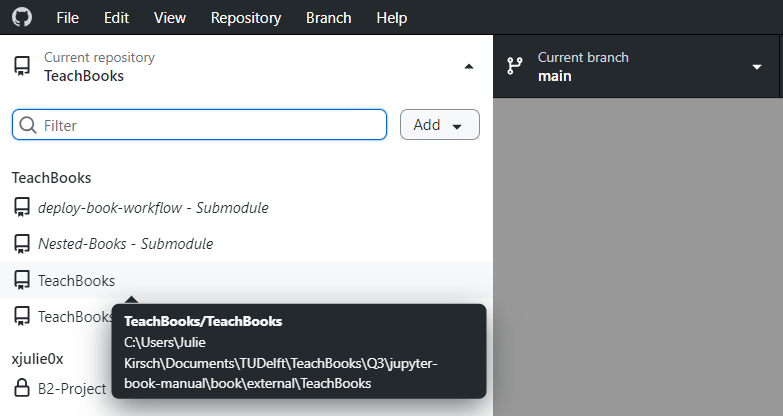
Fig. 96 Nested External Repository#
From the path, you can see that the bottom TeachBooks repository is nested while the top one is not (the parent repository is jupyter-book-manual). We will call the nested repository the external repository from now on. In order to avoid confusion, you can give an ‘alias’ to the external repository by Right Click - Create alias.

Fig. 97 Create Alias#
Now that we have located the right folder book/external/<external repository> on GitHub Desktop, let’s make some changes to your external repository (which is stored locally within your parent repository). You might want to create a separate branch in GitLab/GitHub on the external repository for this. The git workflow is not different than for normal non-nested repositories.
2. Make some changes
If you want to edit a document from the external book, you have do make changes to this document in the external repository but through the parent repository. How can you do this?
On GitHub Desktop, open the parent repository
On Vs Code, open the file you want to edit, it is located in the book/external/
folder Make some changes
As soon as you’ve made the change to a document, that lives in the external repository, through the parent repository, GitHub Desktop shows you in the parent repository that there are changes in the external repository (Submodule Changes):
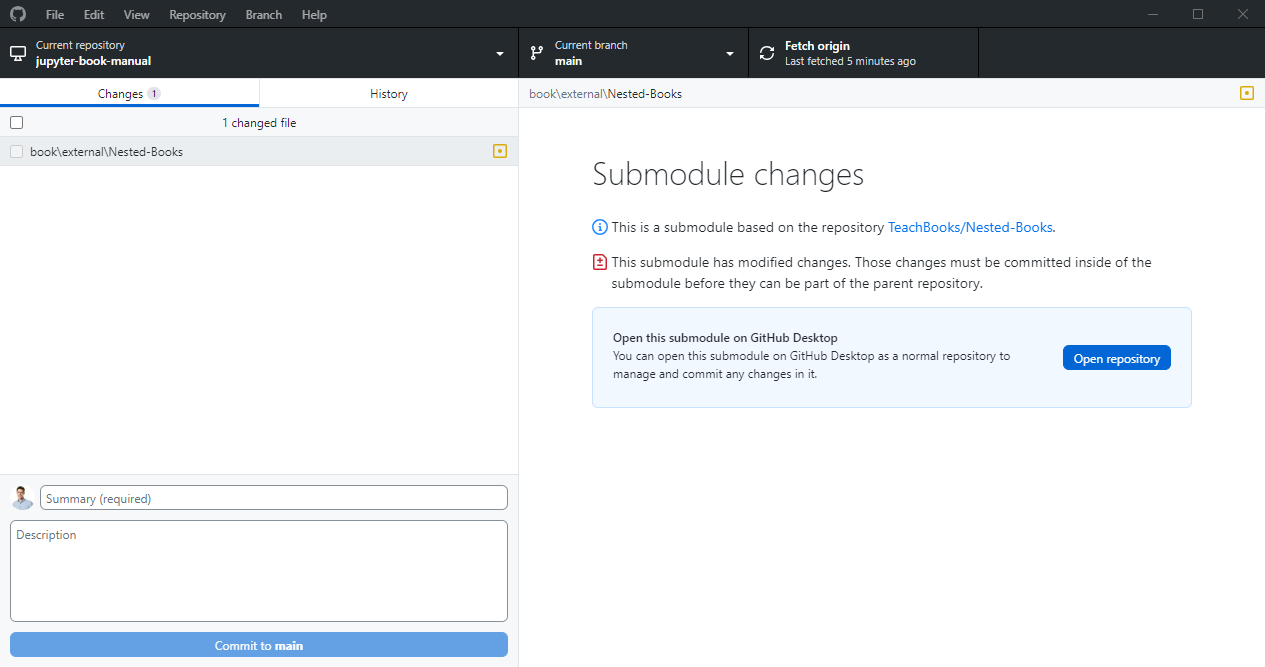
Fig. 98 Change in Submodule#
3. Commit to the external repository
As you can see, GitHub desktop recognizes that there are changes in the nested external repository. You’ll need to commit those to the external repository. Simply click on Open Repository. As you can see from the path by hovering above the current repository, the repository you ‘cloned’ is nested. Go ahead and give it an alias to keep an overview.
GitHub Desktop has automatically opened the external repository and all your changes are visible here. Make a new branch, commit to the new branch and push your changes to the external’s repository GitHub/GitLab as well.

Fig. 99 Changes#
4. Commit to the parent repository
Now return to your parent repository. GitHub Desktop shows in the parent repository that there have been changes in the submodule, and that the parent repository is ready to be ‘updated’.
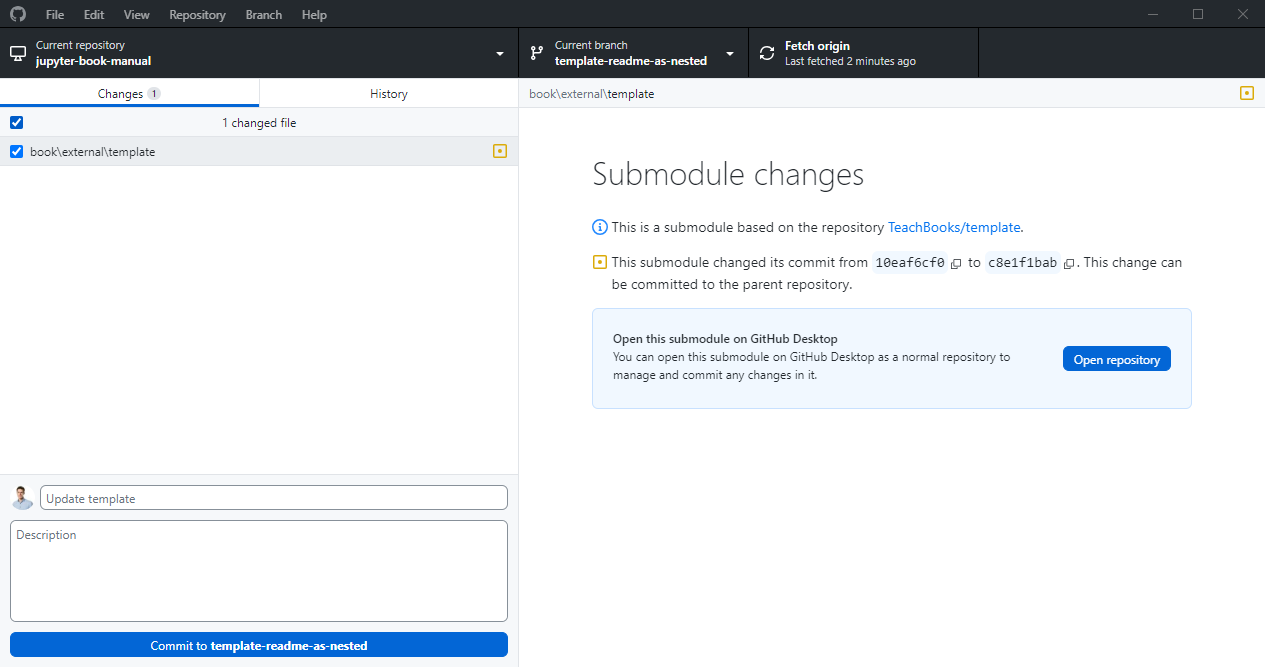
Fig. 100 Update nested repository#
In particular, it says:

Fig. 101 New Commit#
Git uses these commit codes to know which version of the document to refer to. Commit this change to the parent repository, which will change the commit to which it pins. Finally, push your changes to GitLab/GitHub.
If you want to update the submodule online without cloning the repository, you can do so by using GitHub Dev with codespaces online. This example shows the Nested-Books repository as a external repository to the Manual as a parent repository.
1. Open GitHub Dev with codespaces online
On your GitHub repository, click <> Code - Codespaces - Create codespace on main
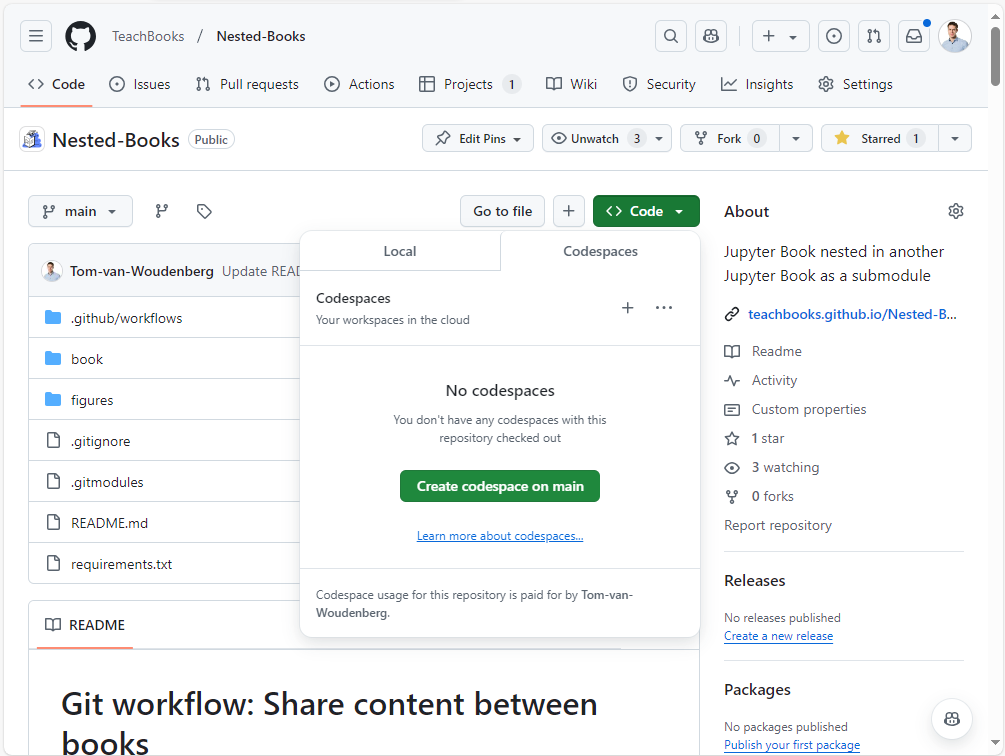
Fig. 102 Codespaces#
2. Initiate submodule
In a Bash terminal, add the command git submodule init and git submodule update to load and clone the external repositories as submodules:

Fig. 103 Initiate submodule#
This will clone all the files of the external books to the parent repository
2. Make a change
If you want to edit a document from the external book, you have do make changes to this document in the external repository. You can do so from the files within the parent repository you just cloned, or in the external book repo.
If you want to update a file directly within this parent repository, you can do so from within the codespace. Commit

Fig. 104 Change external#
If you do it directly in the external book repo, you need to pull those updates in your codespace by clicking the branch and refresh:

Fig. 105 Refresh external repository#
4. Commit to the parent repository
As you can see, your codespaces recognizes that there are changes in the nested external repository:
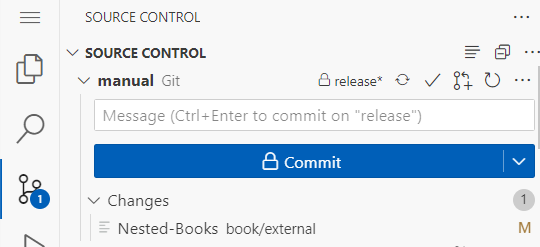
Fig. 106 Update parent repository#
Commit this change to the parent repository, which will change the commit to which it pins. Finally, push/sync your changes.
Cloning with submodules#
If you’re cloning a repository that features submodules, the directories of the submodules will not be populated by default. To fix that, you need to do a recursive clone (i.e., clone the parent repository, as well as the submodules):
git clone --recurse-submodules <link to parent repository>
The external book is updated#
When you add the external book as a submodule to your repository, Git will pin its version. When the external book is updated, you’ll need to manually pull the updates to the parent book or use the automatic GitHub Dependabot.
It is possible to set up Github in such a way that periodically and on demand the submodules in the default branch of the parent repository. To enable this, perform the following steps:
Go to your repository on Github.
Choose Settings.
Choose Code security.
Choose Enable behind Dependabot version updates.
In opened file editor, edit the code to resemble below code and select “Commit changes…”
# To get started with Dependabot version updates, you'll need to specify which
# package ecosystems to update and where the package manifests are located.
# Please see the documentation for all configuration options:
# https://docs.github.com/code-security/dependabot/dependabot-version-updates/configuration-options-for-the-dependabot.yml-file

version: 2
updates:
  - package-ecosystem: "gitsubmodule" # See documentation for possible values
    directory: "/" # Location of package manifests
    schedule:
      interval: "weekly"
      day: "sunday"
      time: "23:59"
This will check every sunday around midnight (UTC) whether any of the submodules have a newer commit in the preferred branch. If so, several things will happen:
A new branch starting with dependabot will be created in the repository and any relevant workflows will be triggered.
A pull request will be created to pull the new branch into the default branch. This pull request must be manually reviewed and merged. Afterwards the dependabot branch can be deleted.
If the workflow call-deploy-book is used, and the dependabot branch should not be built and deployed (and all other branches you do want), you can achieve this by adding the next to the file call-deploy-book.yml:
on:
  push:
    branches:
    - '**'
    - '!dependabot**'
If you want another scheduled workflow, see Dependabot options reference for the options.
If you want to manually trigger the Dependabot workflow, you can do this by doing the next steps:
Go to your repository on Github.
Choose Insights.
Choose Dependency graph.
Choose Dependabot.
Choose Recent update jobs next to
.gitmodules.Choose Check for updates.
git submodule update --remote
First, pull changes for the external repository (which is stored locally in your parent repository)
Now, GitHub Desktop shows for the parent repository that that are changes in the submodule:

Commit this change to the parent repository, which will chang the commit to which it pins.
Build book on GitLab/GitHub with submodule#
If you’re using a GitLab/GitHub workflow, make sure you force it to fetch all the submodules as well. If you’re using the TeachBooks GitHub/GitLab workflow, that has been taken care of.
Delete submodules#
Deleting submodules is a bit notrocious… These steps https://www.baeldung.com/ops/git-submodule-add-remove proved to be useful:
1. Checkout to main
git checkout main
Select main branch
2. Deinitialize submodule
git submodule deinit -f book/external/<external repository>
3. Remove submodule Git directory
Directly from file explorer or
rm -rf .git/modules/book/external/<external repository>
4. Remove from .gitmodules
Directly with text editor or:
git config -f .gitmodules --remove-section submodule.book/external/<external repository>
5. Stage Changes to .gitmodules
git add .gitmodules
Directly commit the change shown
6. Remove from Git cache
git rm --cached book/external<external repository>
7. Commit and push changes
git add .
git commit -m 'rm submodule: <external repository>'
git push
Directly commit and push the changes shown
8. Delete repo and clone again For some reason the existence of the submodule is stored locally somewhere. To prevent further issues, you might want to delete the full parent repository and reclone it.
9. Merge with other branches Merge this change with all other branches which still have this submodule.
More info#
Here you can find more information on Git submodules.
Contribute#
This tool’s repository is stored on GitHub. The README.md of the branch manual-description is also part of the TeachBooks manual as a submodule. If you’d like to contribute, you can create a fork and open a pull request on the GitHub repository. To update the README.md shown in the TeachBooks manual, create a fork and open a merge request for the GitHub repository of the manual. If you intent to clone the manual including its submodules, clone using: git clone --recurse-submodulesgit@github.com:TeachBooks/manual.git.