Edit (merge conflicts, staging, committing, pushing)#
Suppose we are writing a new chapter, or are updating an existing chapter for our Jupyter Book. We’ve created a new branch on which we are going to make the changes.
Edit files as …
… by directly adding changes on a single file to the Git-timeline (committing) in …
How to make an edit and make a commit is demonstrated in the gif below.
Don’t worry if the steps are too fast, all steps are elaborated on in the following step-by-step tutorial.
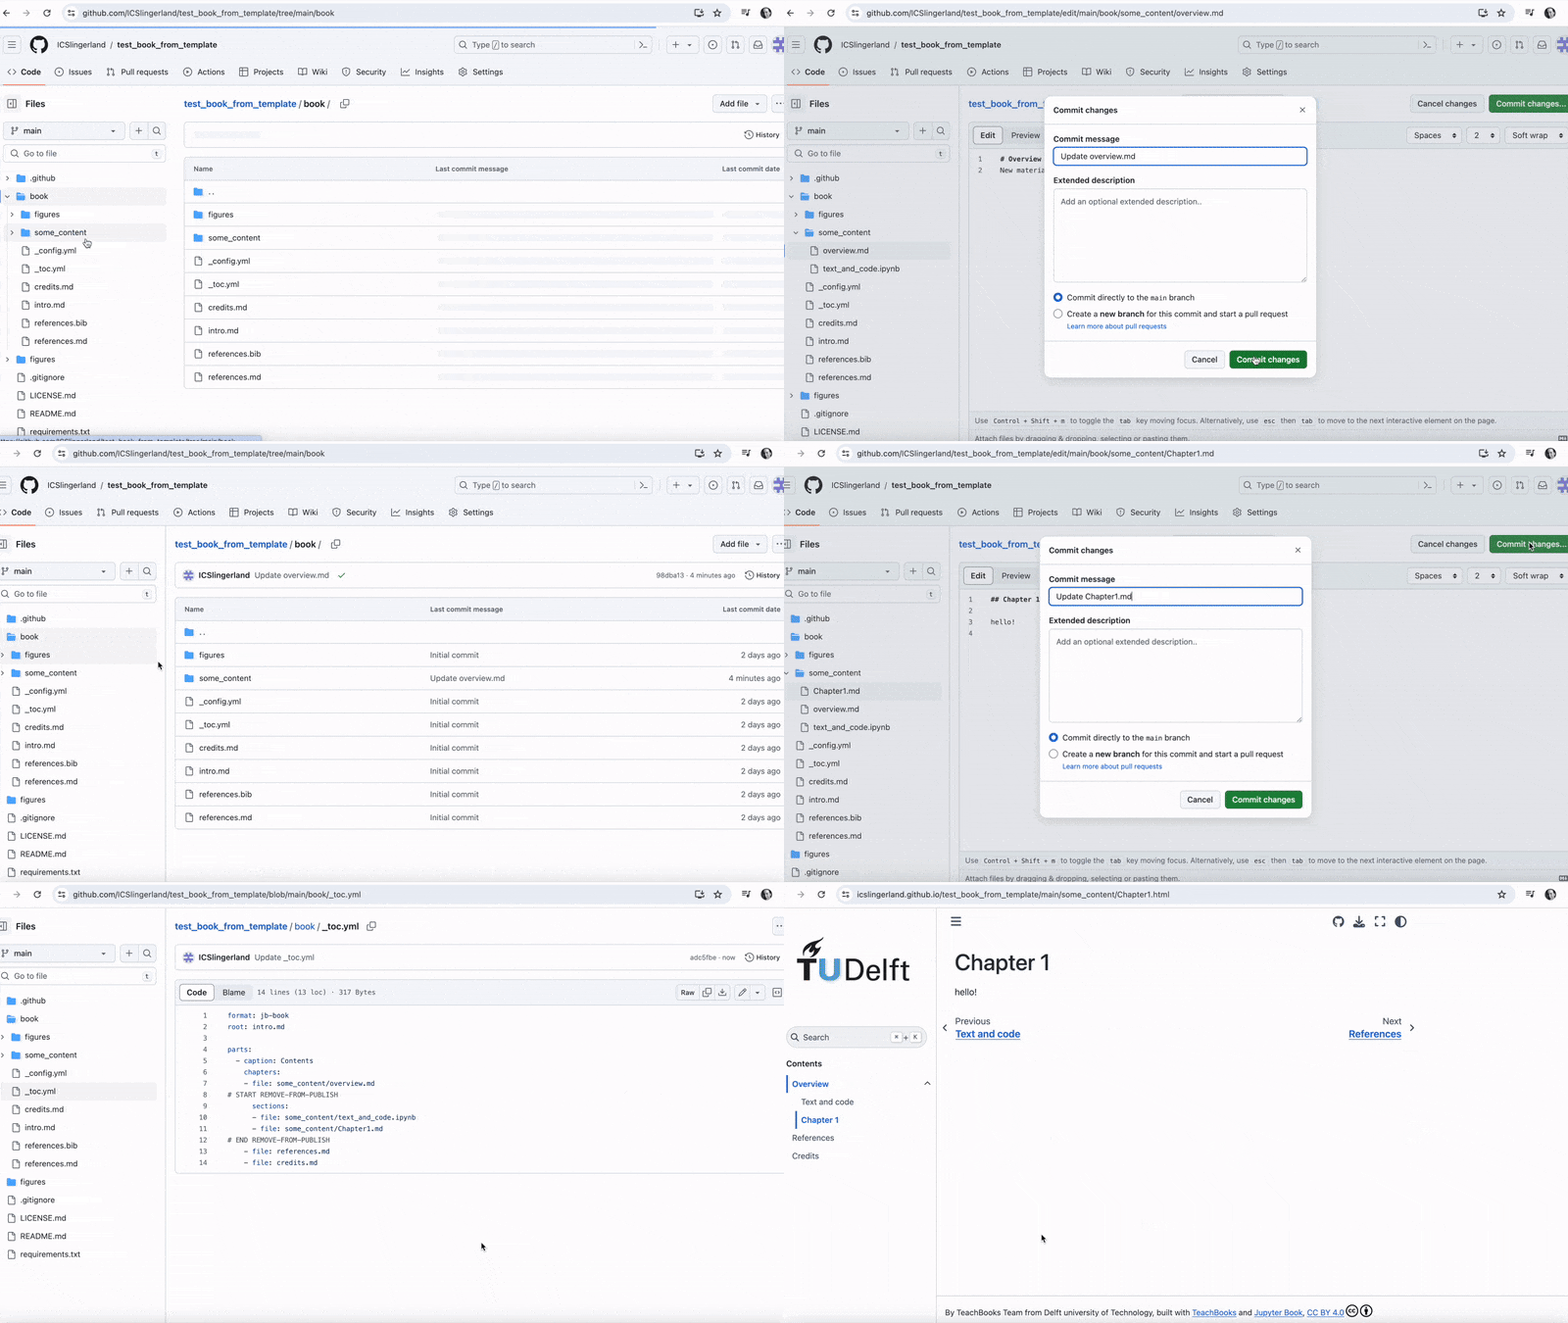
In GitHub, you can directly make changes in the files on the remote repository. You can make changes to the files already in the repository using the text editor but you can also upload new files!
Navigate to the repository you want to work in and make sure you’re in the correct branch.
Create a new file by clicking on the button called
Add filein the top bar. You can either create an entirely new file by clickingCreate new Fileor if you already have created a file you can upload it by clickingUpload files.
Fig. 33 Create new file#
In the new window, you can start typing your content. Give your file a name and make sure to use the markdown extension:
file_name.md. Once you are done, commit the new file to the repository by clicking the green buttonCommit changes.
Fig. 34 Edit new file#
In case you want to make changes to an existing file, navigate to the file in your remote repository. Then click the downward pointing arrow on the very left in the top bar. Select the option
Edit in place.
Fig. 35 Edit in place#
Make your changes in the text editor and when you are ready, commit your changes to the remote repository by clicking on the green
Commit changesbutton.
Fig. 36 Commit changes#
In case you added a new file, you also need to include it table of contents of your book! The table of contents is specified in a file called
toc.ymland it is already included in your repository if you used the teachbooks template. You can edit it and commit the changes in the same manner as with markdown(file.md)files.
Fig. 37 Table of contents#
Using this feature, you can open VS Code in your browser and edit the files in your repository. By doing this, you completely by-pass the need to open (and install) VS Code and GitHub Desktop on your laptop making it the optimal way to quickly fix something. You can make changes to the files already in the repository but you can also upload new files!
Navigate to the repository you want to work in and make sure you’re in the correct branch.
Navigate to your main page (
code) of your repository in GitHub.Press the dot key on your keyboard
.This will open VS Code.In case you want to add a new file, navigate to the explorer file (the page icon) and click on the
New Fileicon. This will create a new file in the folder that you are in. Give it the right extension!
Fig. 38 New File#
In case you want to make changes to an existing file, navigate to a file and make some changes.
Fig. 39 VS Code in Browser#
In the bottom left you can see the branch you are working in.
Once all the changes are made it’s time to commit and push. GitHub Dev requires you to use git in VS Code. You can do that in the Source Control tab in the activity bar on the left side of the window (it looks like a branching icon). Write your commit message and click on commit & push.
Now let’s see the result. Go back to your GitHub repo. In the top bar, go to actions.
Fig. 40 GitHub Actions#
You will see the latest commit you just did (in this case text). After the pipeline has run, the yellow icon will turn green. Click on the commit and scroll until you see the title Deployed Branches.
Fig. 41 Deployed Branches#
Click on the link and admire your changes:)
In GitLab, you can directly make changes in the files on the remote repository. You can make changes to the files already in the repository using the text editor but you can also upload new files!
Navigate to the repository you want to work in and make sure you’re in the correct branch.
Create a new file by clicking on the plus button in the top bar. You can either create an entirely new file by clicking
New Fileor if you already have created a file you can upload it by clickingUpload File.
Fig. 42 Create new file#
In the new window, you can start typing your content. Give your file a name and make sure to use the markdown extension:
Chapter1.md. Once you are done, commit the new file to the repository by clicking the blue buttonCommit changes.
Fig. 43 Edit new file#
In case you want to make changes to an existing file, navigate to the file in your remote repository. Then click the blue button called
Editand select the optionEdit single file.
Fig. 44 Web Editor#
Make your changes in the text editor and when you are ready, commit your changes to the remote repository by clicking on the blue
Commit changesbutton.
Fig. 45 Commit changes#
In case you added a new file, you also need to include it table of contents of your book! The table of contents is specified in a file called
toc.ymland it is already included in your repository if you used the teachbooks template. You can edit it and commit the changes in the same manner as you did with markdownfile.mdfiles.
Fig. 46 Table of contents (TOC)#
… by (a) making changes on a single or multiple file(s)
(b) selecting changes to be added to the Git-timeline (staging)
(c) adding changes to the Git-timeline (committing) and
(d) adding changes to GitHub/GitLab (pushing) with …
How to make an edit and make a commit using VS Code is demonstrated in the figure below, all steps are elaborated on in the following step-by-step tutorial.
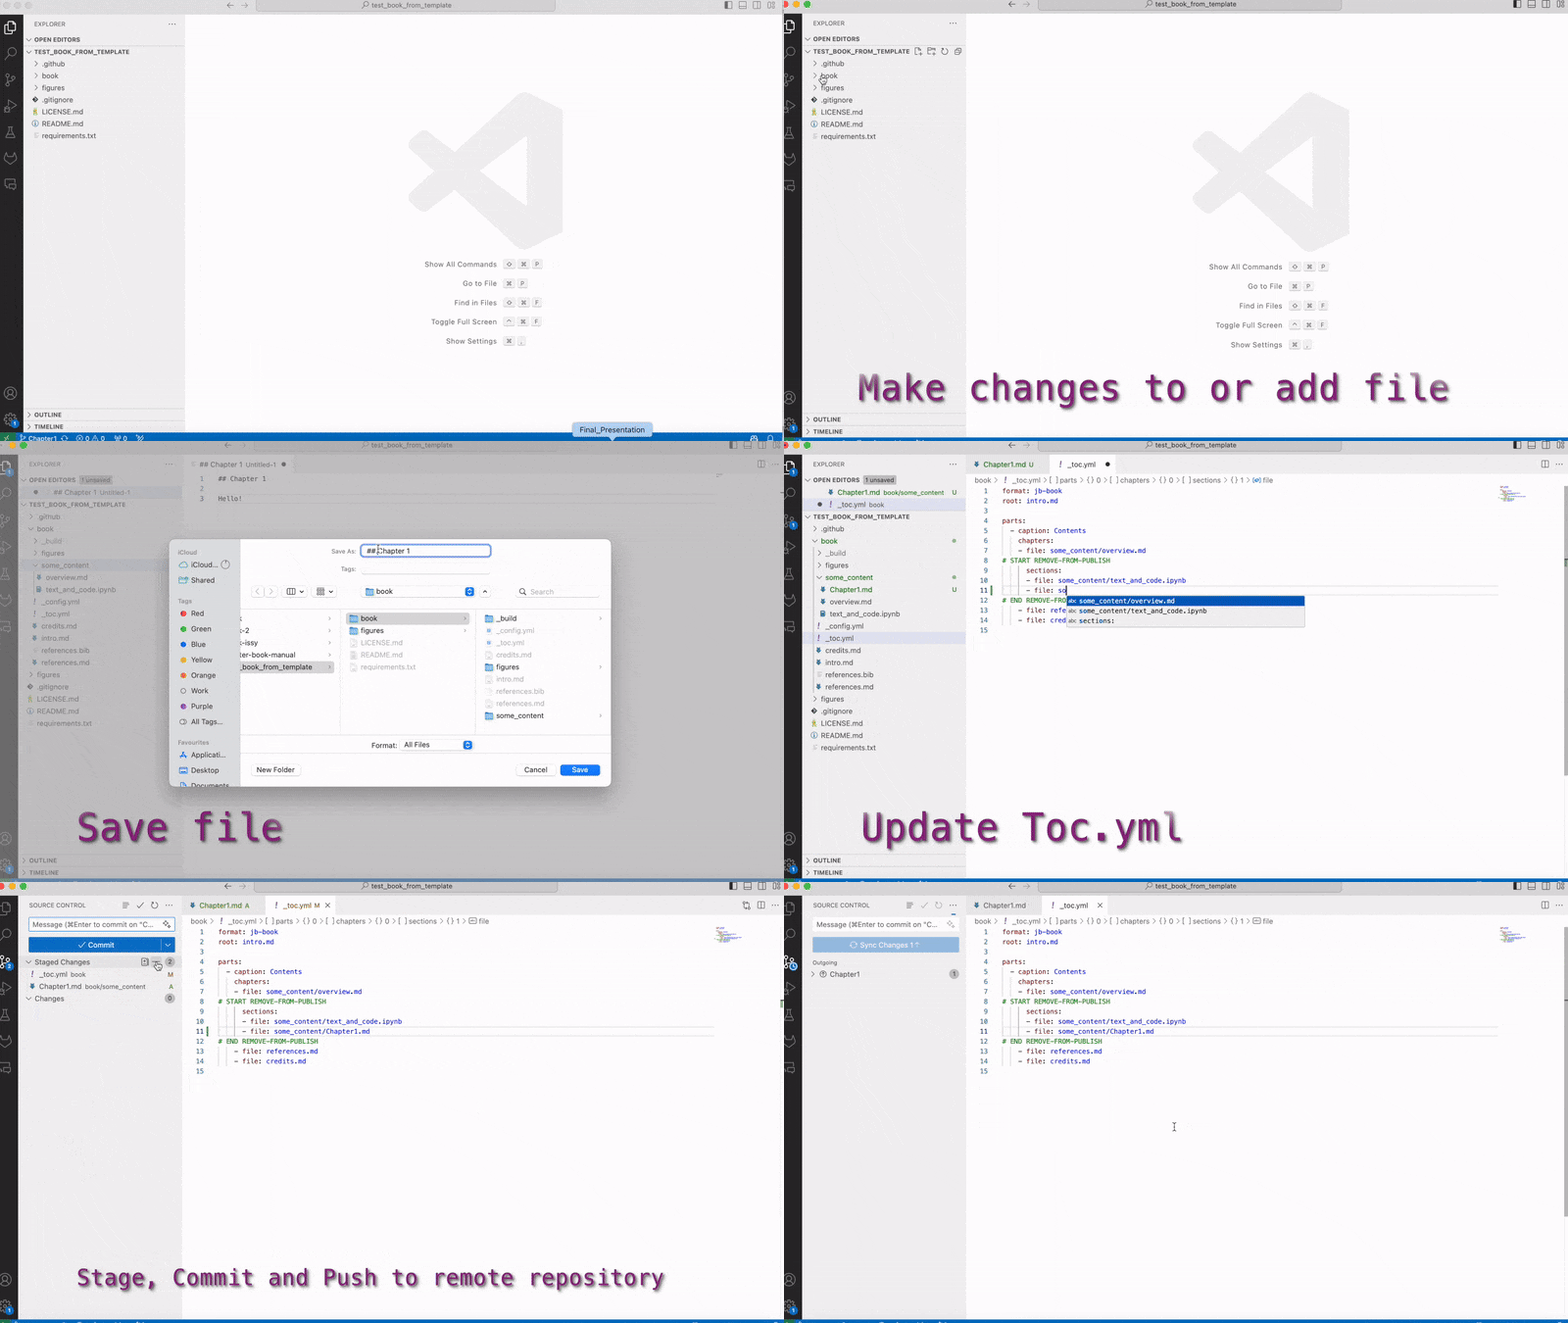
Make some changes to a file in for example VS Code and save them
Selecting changes to be added to the Git-timeline (staging)
For demonstration purposes, we have created a new Markdown file called new-chapter.md, which we want to add to the book. Since this is a new file, Git has no knowledge about its existence yet. I.e., the file is untracked. To add new files to our repository, we need to stage and commit them. To do this, open the Source Control menu in the left side bar. Our new file should appear in this menu:
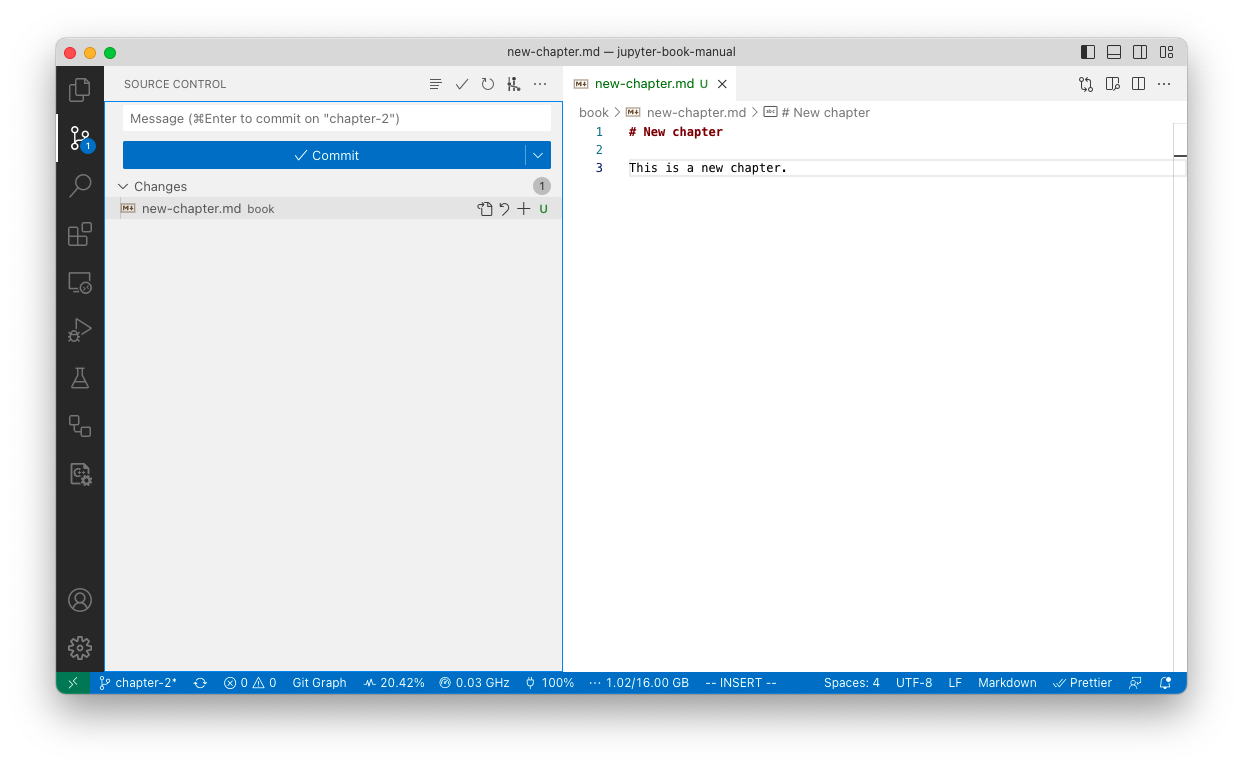
Fig. 48 The new file appears in the Source Control menu.#
Notice that there is a green letter U placed besides the file, meaning that our file is untracked. To add a file to the staging area, click on the + that appears when you hover over the file.
Adding changes to the Git-timeline (committing)
Next, in the field that says “Message”, write a short description of the changes you have made. This message is what is called the Commit Message. After we’ve done this, the menu should now look something like this:
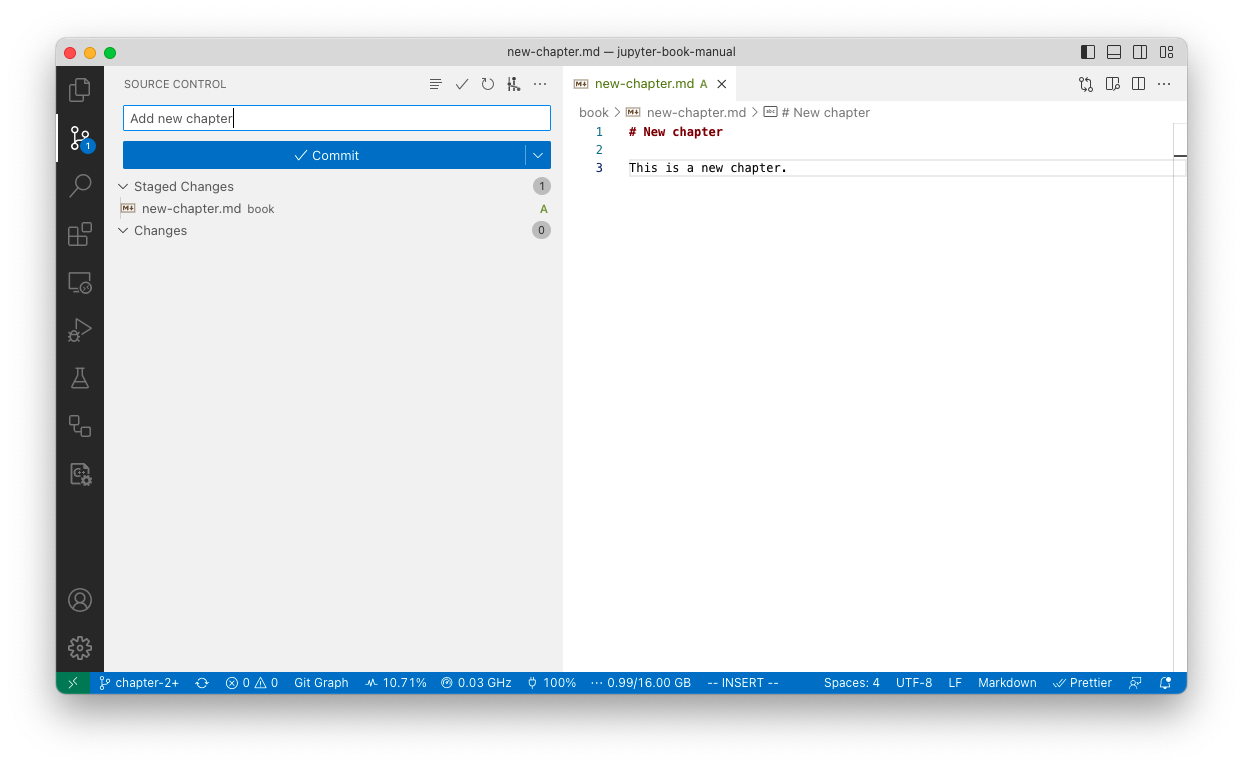
Fig. 49 The new file has been staged, and we’ve written a Commit Message.#
Now, we are ready to add the changes to the repository. This is done by committing the staged changes. To do this, simply press the big, blue “Commit” button in the Source Control menu.
Adding changes to GitLab/GitHub (pushing)
In the bottom left corner, next to the branch name, click the “Synchronize Changes” button (the one that looks like this: 🔄, highlighted in the image below) to push the changes to GitLab/GitHub.
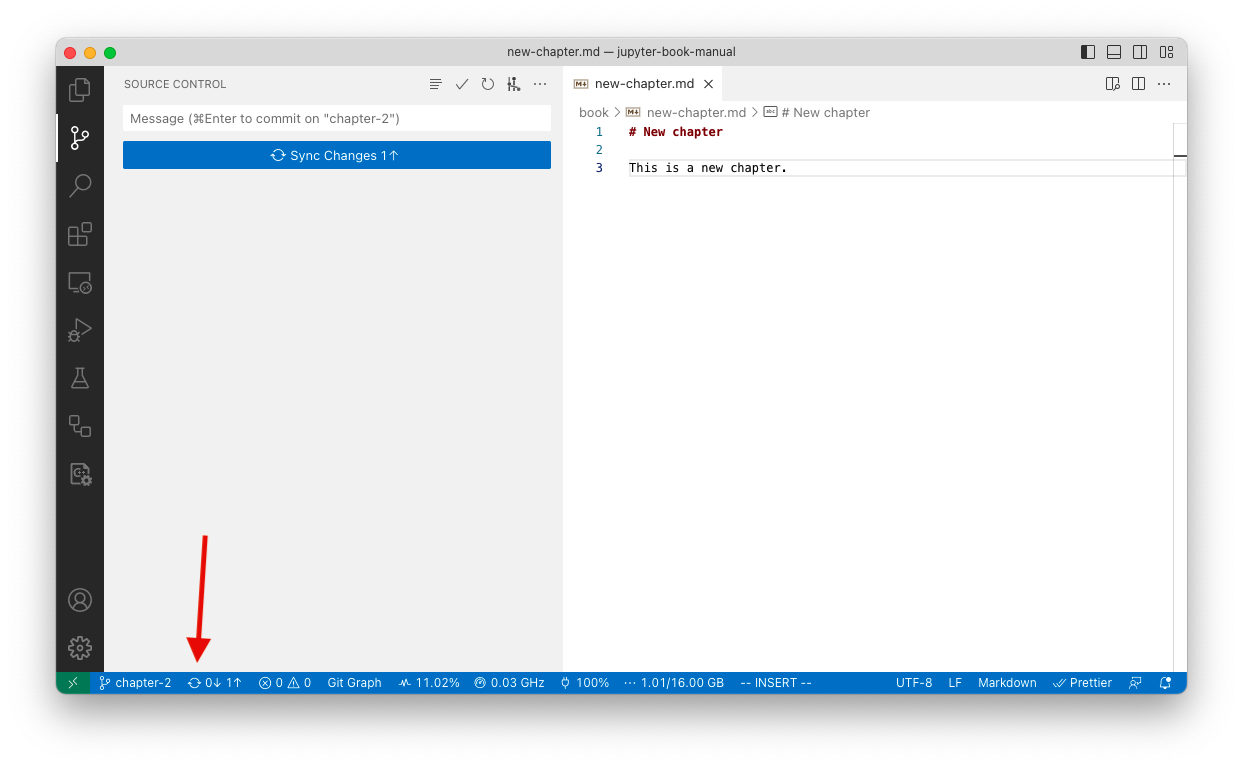
Fig. 50 After committing, click the 🔄 button to push our changes to the remote repository.#
Make some changes to a file in for example VS Code and save them
Selecting changes to be added to the Git-timeline (staging)
The staging GitHub Desktop assumes you want to stage all files. These files will show up on the left side bar when you open GitHub Desktop. You can unselect some of them (unstaging them) by clicking on the check.
Fig. 51 Staging#
Adding changes to the Git-timeline (committing)
In the field that says Summary(Required), write a short description of the changes you have made. This message is what is called the Commit Message. After you’ve done this, click the blue button Commit to repository.
Adding changes to GitLab/GitHub (pushing)
Now we need to add changes to GitHub/GitLab. This is called pushing to the remote repository. After committing, click on Push origin in the top bar.
Fig. 52 Push origin#
… by (a) regularly obtaining updates from colleagues from GitHub/GitLab (pulling),
(b) solving potential incompatible changes (merging conflicts),
(c) making changes on a single / multiple file(s),
(d) selecting changes to be added to the Git-timeline (staging),
(e) adding those to the Git-timeline (committing) and
(f) adding changes to GitHub/GitLab (pushing) with …
Regularly obtain updates from colleagues from GitHub/GitLab (pulling)
If you collaborate with colleagues on your branch, you can get the updates from your colleagues as well by pulling from GitHub/GitLab. This synchronizes the remote repository with your local repository on your machine. On the left side-bar click on the icon that looks like a branch.
By clicking on the 🔄 button, you will pull your colleages’ changes.
Solving potential incompatible changes (merging conflicts)
When multiple people work on one chapter, it is possible that conflicts will arise if you and your colleagues have made incompatible changes in the same branch. In that case, when pulling from the remote repository, Git in VS Code will recognize conflicts and help you to solve potential incompatible changes (merging conflicts). Open the files that are marked as conflicitng.
The figure above shows the conflicts. If you look closely you can see that the last couple of words of the paragraph are different in the main branch than in the branch we were working in. There are a couple of options in the top bar:
Accept Current Changewill keep the change in your branchAccept Incoming Changewill keep the change from the main branch (the branch you are merging into your branch)Accept Both Changeswill retain both paragraphs
Choose one of the options to resolve the merge conflict. You now have updated your work with work from your colleagues and resolved potential conlicts. You are now ready to continue working on the content.
Make some further changes to a file in for example VS Code and save them
Selecting changes to be added to the Git-timeline (staging)
For demonstration purposes, we have created a new Markdown file called new-chapter.md, which we want to add to the book. Since this is a new file, Git has no knowledge about its existence yet. I.e., the file is untracked. To add new files to our repository, we need to stage and commit them. To do this, open the Source Control menu in the left side bar. Our new file should appear in this menu:

Fig. 53 The new file appears in the Source Control menu.#
Notice that there is a green letter U placed besides the file, meaning that our file is untracked. To add a file to the staging area, click on the + that appears when you hover over the file.
Adding changes to the Git-timeline (committing)
Next, in the field that says “Message”, write a short description of the changes you have made. This message is what is called the Commit Message. After we’ve done this, the menu should now look something like this:

Fig. 54 The new file has been staged, and we’ve written a Commit Message.#
Now, we are ready to add the changes to the repository. This is done by committing the staged changes. To do this, simply press the big, blue “Commit” button in the Source Control menu.
Adding changes to GitLab/GitHub (pushing)
In the bottom left corner, next to the branch name, click the “Synchronize Changes” button (the one that looks like this: 🔄, highlighted in the image below) to push the changes to GitLab/GitHub.

Fig. 55 After committing, click the 🔄 button to push our changes to the remote repository.#
Regularly obtain updates from colleagues from GitHub/GitLab (pulling)
If you collaborate with colleagues on your branch, you can get the updates from your colleagues as well by pulling from GitHub/GitLab. This synchronizes the remote repository with your local repository on your machine. Click on Fetch in the top bar. Then on the same place, click on ‘Pull’.
Solving potential incompatible changes (merging conflicts)
When multiple people work on one chapter, it is possible that conflicts will arise if you and your colleagues have made incompatible changes in the same branch. In that case, when pulling from the remote repository, GitHub Desktop will recognize conflicts and help you to solve potential incompatible changes (merging conflicts).
In this case there are two conflicted files. GitHub Desktop is suggesting to resolve the changes in VS Code (in that case have a look at the section treating VS Code). By clicking on the small downwards arrow you can also solve the conflict directly in GitHub Desktop by choosing the branch of the file you want to keep.
The figure above shows the conflicts. If you look closely you can see that the last couple of words of the paragraph are different in the main branch than in the branch we were working in. There are a couple of options in the top bar:
Accept Current Changewill keep the change in your branchAccept Incoming Changewill keep the change from the main branch (the branch you are merging into your branch)Accept Both Changeswill retain both paragraphs
Choose one of the options to resolve the merge conflict. You now have updated your work with work from your colleagues and resolved potential conlicts. You are now ready to continue working on the content.
Make some further changes to a file in for example VS Code and save them
Selecting changes to be added to the Git-timeline (staging)
The staging GitHub Desktop assumes you want to stage all files. These files will show up on the left side bar when you open GitHub Desktop. You can unselect some of them (unstaging them) by clicking on the check.
Fig. 56 Staging#
Adding changes to the Git-timeline (committing)
In the field that says Summary(Required), write a short description of the changes you have made. This message is what is called the Commit Message. After you’ve done this, click the blue button Commit to repository.
Adding changes to GitLab/GitHub (pushing)
Now we need to add changes to GitHub/GitLab. This is called pushing to the remote repository. After committing, click on Push origin in the top bar.
Fig. 57 Push origin#
Using this feature, you can open VS Code in your browser and edit the files in your repository. This can be really useful for quick fixes when you dont want to launch GitHub Dekstop or VS Code. However, we would recommend to limit the use of this feature to quick changes as the other workflows allow for more complex tasks.
Navigate to the repository you want to work in and make sure you’re in the correct branch.
Navigate to your main page (
code) of your repository in GitHub.Press the dot key on your keyboard
.This will open VS Code.In case you want to add a new file, navigate to the explorer file (the page icon) and click on the
New Fileicon. This will create a new file in the folder that you are in. Give it the right extension!
Fig. 58 New File#
In case you want to make changes to an existing file, navigate to a file and make some changes.
Fig. 59 VS Code in Browser#
In the bottom left you can see the branch you are working in.
Once all the changes are made it’s time to commit and push. GitHub Dev requires you to use git in VS Code. You can do that in the Source Control tab in the activity bar on the left side of the window (it looks like a branching icon). Write your commit message and click on commit & push.
Now let’s see the result. Go back to your GitHub repo. In the top bar, go to actions.
Fig. 60 GitHub Actions#
You will see the latest commit you just did (in this case text). After the pipeline has run, the yellow icon will turn green. Click on the commit and scroll until you see the title Deployed Branches.
Fig. 61 Deployed Branches#
Click on the link and admire your changes:)
… by (a) making changes on a single or multiple file(s)
(b) checking changes locally
(c) selecting changes to be added to the Git-timeline (staging)
(d) adding changes to the Git-timeline (committing) and
(e) adding changes to GitHub/GitLab (pushing) with …
The steps above are demonstrated in the figure below, all steps are elaborated on in the following step-by-step tutorial.
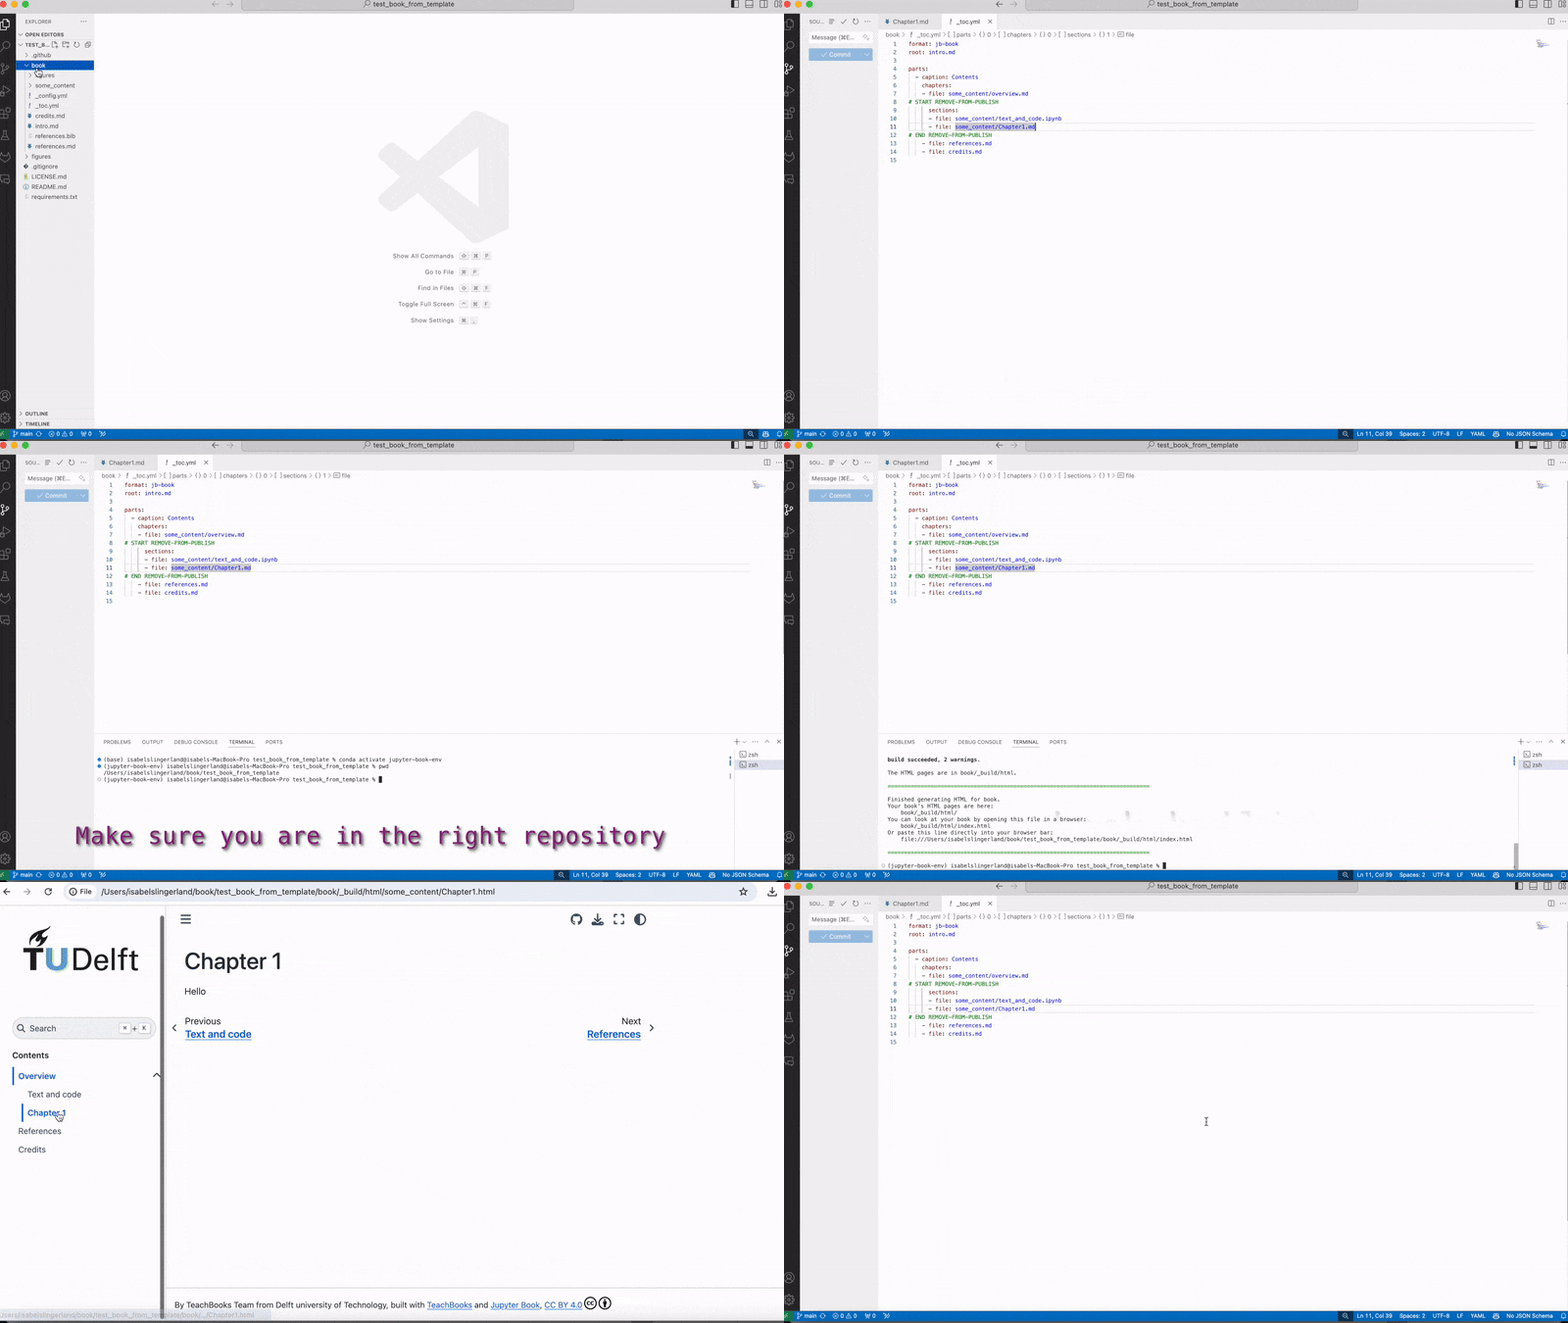
Make some changes to a file in for example VS Code and save them
Checking changes locally
Once all the changes are made, it can be useful to check the changes locally on your device.
By doing that you can preview how it will look on the website. If all the required environments and packages are downloaded, checking changes locally is fairly easy.
Navigate to the terminal in VS code, located at the bottom of the window or by clicking on Terminal in the top bar.
You will firstly need to activate the right environment. Type the following command:
conda activate my_new_book_env
(or the environment in which you have installed the teachbooks package!)
Then we can build the book locally. Make sure you are in the right repository in VS code and type the following command:
teachbooks build <path-to-book>
Note: use --all for the jupyter-book whenever building a book to make sure the table of contents fully updates. Or alternatively, delete the old _build folder before building the new book.
Where book is the name of the folder containing all the files that make up your book. After teachbooks is done running you will get the following:
Fig. 63 Output#
Paste the last line into your browser to see the updated changes.
Note
Sometimes there are problems building the book. It could be that the building requires extensions that are not present in your environment. To prevent issues, make sure to update your environment by routinely updating your packages. You can do this by executing the following line in your environment in the command line.
pip install -r requirements.txt --upgrade
If your book includes interactive element a webserver is required to host the book. If you want to do this locally, you can make use of (the teachbooks package to start up a local webserver)[setup-local-server]
Selecting changes to be added to the Git-timeline (staging)
For demonstration purposes, we have created a new Markdown file called new-chapter.md, which we want to add to the book. Since this is a new file, Git has no knowledge about its existence yet. I.e., the file is untracked. To add new files to our repository, we need to stage and commit them. To do this, open the Source Control menu in the left side bar. Our new file should appear in this menu:

Fig. 64 The new file appears in the Source Control menu.#
Notice that there is a green letter U placed besides the file, meaning that our file is untracked. To add a file to the staging area, click on the + that appears when you hover over the file.
Adding changes to the Git-timeline (committing)
Next, in the field that says “Message”, write a short description of the changes you have made. This message is what is called the Commit Message. After we’ve done this, the menu should now look something like this:

Fig. 65 The new file has been staged, and we’ve written a Commit Message.#
Now, we are ready to add the changes to the repository. This is done by committing the staged changes. To do this, simply press the big, blue “Commit” button in the Source Control menu.
Adding changes to GitLab/GitHub (pushing)
In the bottom left corner, next to the branch name, click the “Synchronize Changes” button (the one that looks like this: 🔄, highlighted in the image below) to push the changes to GitLab/GitHub.

Fig. 66 After committing, click the 🔄 button to push our changes to the remote repository.#
Make some changes to a file in for example VS Code and save them
Checking changes locally
Once all the changes are made, it can be useful to check the changes locally on your device.
By doing that you can preview how it will look on the website. If all the required environments and packages are downloaded, checking changes locally is fairly easy.
Navigate to the terminal in VS code, located at the bottom of the window or by clicking on Terminal in the top bar.
You will firstly need to activate the right environment. Type the following command:
conda activate my_new_book_env
(or the environment in which you have installed the teachbooks package!)
Then we can build the book locally. Make sure you are in the right repository in VS code and type the following command:
teachbooks build <path-to-book>
Note: use --all for the jupyter-book whenever building a book to make sure the table of contents fully updates. Or alternatively, delete the old _build folder before building the new book.
Where book is the name of the folder containing all the files that make up your book. After teachbooks is done running you will get the following:
Fig. 67 Output#
Paste the last line into your browser to see the updated changes.
Note
Sometimes there are problems building the book. It could be that the building requires extensions that are not present in your environment. To prevent issues, make sure to update your environment by routinely updating your packages. You can do this by executing the following line in your environment in the command line.
pip install -r requirements.txt --upgrade
If your book includes interactive element a webserver is required to host the book. If you want to do this locally, you can make use of (the teachbooks package to start up a local webserver)[setup-local-server]
Selecting changes to be added to the Git-timeline (staging)
The staging GitHub Desktop assumes you want to stage all files. These files will show up on the left side bar when you open GitHub Desktop. You can unselect some of them (unstaging them) by clicking on the check.
Fig. 68 Staging#
Adding changes to the Git-timeline (committing)
In the field that says Summary(Required), write a short description of the changes you have made. This message is what is called the Commit Message. After you’ve done this, click the blue button Commit to repository.
Adding changes to GitLab/GitHub (pushing)
Now we need to add changes to GitHub/GitLab. This is called pushing to the remote repository. After committing, click on Push origin in the top bar.
Fig. 69 Push origin#
… by (a) regularly obtaining updates from colleagues from GitHub/GitLab (pulling),
(b) solving potential incompatible changes (merging conflicts),
(c) making changes on a single / multiple file(s),
(d) checking changes locally,
(e) selecting changes to be added to the Git-timeline (staging),
(f) adding those to the Git-timeline (committing) and
(g) adding changes to GitHub/GitLab (pushing) with …
Regularly obtain updates from colleagues from GitHub/GitLab (pulling)
If you collaborate with colleagues on your branch, you can get the updates from your colleagues as well by pulling from GitHub/GitLab. This synchronizes the remote repository with your local repository on your machine. On the left side-bar click on the icon that looks like a branch.
By clicking on the 🔄 button, you will pull your colleages’ changes.
Solve potential incompatible changes (merging conflicts)
When multiple people work on one chapter, it is possible that conflicts will arise if you and your colleagues have made incompatible changes in the same branch. In that case, when pulling from the remote repository, Git in VS Code will recognize conflicts and help you to solve potential incompatible changes (merging conflicts). Open the files that are marked as conflicitng.
The figure above shows the conflicts. If you look closely you can see that the last couple of words of the paragraph are different in the main branch than in the branch we were working in. There are a couple of options in the top bar:
Accept Current Changewill keep the change in your branchAccept Incoming Changewill keep the change from the main branch (the branch you are merging into your branch)Accept Both Changeswill retain both paragraphs
Choose one of the options to resolve the merge conflict. You now have updated your work with work from your colleagues and resolved potential conlicts. You are now ready to continue working on the content.
Make some further changes to a file in for example VS Code and save them
Checking changes locally
Once all the changes are made, it can be useful to check the changes locally on your device.
By doing that you can preview how it will look on the website. If all the required environments and packages are downloaded, checking changes locally is fairly easy.
Navigate to the terminal in VS code, located at the bottom of the window or by clicking on Terminal in the top bar.
You will firstly need to activate the right environment. Type the following command:
conda activate my_new_book_env
(or the environment in which you have installed the teachbooks package!)
Then we can build the book locally. Make sure you are in the right repository in VS code and type the following command:
teachbooks build <path-to-book>
Note: use --all for the jupyter-book whenever building a book to make sure the table of contents fully updates. Or alternatively, delete the old _build folder before building the new book.
Where book is the name of the folder containing all the files that make up your book. After teachbooks is done running you will get the following:
Fig. 70 Output#
Paste the last line into your browser to see the updated changes.
Note
Sometimes there are problems building the book. It could be that the building requires extensions that are not present in your environment. To prevent issues, make sure to update your environment by routinely updating your packages. You can do this by executing the following line in your environment in the command line.
pip install -r requirements.txt --upgrade
If your book includes interactive element a webserver is required to host the book. If you want to do this locally, you can make use of (the teachbooks package to start up a local webserver)[setup-local-server]
Selecting changes to be added to the Git-timeline (staging)
For demonstration purposes, we have created a new Markdown file called new-chapter.md, which we want to add to the book. Since this is a new file, Git has no knowledge about its existence yet. I.e., the file is untracked. To add new files to our repository, we need to stage and commit them. To do this, open the Source Control menu in the left side bar. Our new file should appear in this menu:

Fig. 71 The new file appears in the Source Control menu.#
Notice that there is a green letter U placed besides the file, meaning that our file is untracked. To add a file to the staging area, click on the + that appears when you hover over the file.
Adding changes to the Git-timeline (committing)
Next, in the field that says “Message”, write a short description of the changes you have made. This message is what is called the Commit Message. After we’ve done this, the menu should now look something like this:

Fig. 72 The new file has been staged, and we’ve written a Commit Message.#
Now, we are ready to add the changes to the repository. This is done by committing the staged changes. To do this, simply press the big, blue “Commit” button in the Source Control menu.
Adding changes to GitLab/GitHub (pushing)
In the bottom left corner, next to the branch name, click the “Synchronize Changes” button (the one that looks like this: 🔄, highlighted in the image below) to push the changes to GitLab/GitHub.

Fig. 73 After committing, click the 🔄 button to push our changes to the remote repository.#
Regularly obtain updates from colleagues from GitHub/GitLab (pulling)
If you collaborate with colleagues on your branch, you can get the updates from your colleagues as well by pulling from GitHub/GitLab. This synchronizes the remote repository with your local repository on your machine. Click on Fetch in the top bar. Then on the same place, click on ‘Pull’.
Solve potential incompatible changes (merging conflicts)
When multiple people work on one chapter, it is possible that conflicts will arise if you and your colleagues have made incompatible changes in the same branch. In that case, when pulling from the remote repository, GitHub Desktop will recognize conflicts and help you to solve potential incompatible changes (merging conflicts).
In this case there are two conflicted files. GitHub Desktop is suggesting to resolve the changes in VS Code (in that case have a look at the section treating VS Code). By clicking on the small downwards arrow you can also solve the conflict directly in GitHub Desktop by choosing the branch of the file you want to keep.
Choose one of the options to resolve the merge conflict. You now have updated your work with work from your colleagues and resolved potential conlicts. You are now ready to continue working on the content.
Make some further changes to a file in for example VS Code and save them
Checking changes locally
Once all the changes are made, it can be useful to check the changes locally on your device.
By doing that you can preview how it will look on the website. If all the required environments and packages are downloaded, checking changes locally is fairly easy.
Navigate to the terminal in VS code, located at the bottom of the window or by clicking on Terminal in the top bar.
You will firstly need to activate the right environment. Type the following command:
conda activate my_new_book_env
(or the environment in which you have installed the teachbooks package!)
Then we can build the book locally. Make sure you are in the right repository in VS code and type the following command:
teachbooks build <path-to-book>
Note: use --all for the jupyter-book whenever building a book to make sure the table of contents fully updates. Or alternatively, delete the old _build folder before building the new book.
Where book is the name of the folder containing all the files that make up your book. After teachbooks is done running you will get the following:
Fig. 74 Output#
Paste the last line into your browser to see the updated changes.
Note
Sometimes there are problems building the book. It could be that the building requires extensions that are not present in your environment. To prevent issues, make sure to update your environment by routinely updating your packages. You can do this by executing the following line in your environment in the command line.
pip install -r requirements.txt --upgrade
If your book includes interactive element a webserver is required to host the book. If you want to do this locally, you can make use of (the teachbooks package to start up a local webserver)[setup-local-server]
Selecting changes to be added to the Git-timeline (staging)
The staging GitHub Desktop assumes you want to stage all files. These files will show up on the left side bar when you open GitHub Desktop. You can unselect some of them (unstaging them) by clicking on the check.
Fig. 75 Staging#
Adding changes to the Git-timeline (committing)
In the field that says Summary(Required), write a short description of the changes you have made. This message is what is called the Commit Message. After you’ve done this, click the blue button Commit to repository.
Adding changes to GitLab/GitHub (pushing)
Now we need to add changes to GitHub/GitLab. This is called pushing to the remote repository. After committing, click on Push origin in the top bar.
Fig. 76 Push origin#
Using this feature, you can open VS Code in your browser and edit the files in your repository. This can be really useful for quick fixes when you dont want to launch GitHub Dekstop or VS Code. However, we would recommend to limit the use of this feature to quick changes as the other workflows allow for more complex tasks.
Navigate to the repository you want to work in and make sure you’re in the correct branch.
Navigate to your main page (
code) of your repository in GitHub.Press the dot key on your keyboard
.This will open VS Code.In case you want to add a new file, navigate to the explorer file (the page icon) and click on the
New Fileicon. This will create a new file in the folder that you are in. Give it the right extension!
Fig. 77 New File#
In case you want to make changes to an existing file, navigate to a file and make some changes.
Fig. 78 VS Code in Browser#
In the bottom left you can see the branch you are working in.
Once all the changes are made it’s time to commit and push. GitHub Dev requires you to use git in VS Code. You can do that in the Source Control tab in the activity bar on the left side of the window (it looks like a branching icon). Write your commit message and click on commit & push.
Now let’s see the result. Go back to your GitHub repo. In the top bar, go to actions.
Fig. 79 GitHub Actions#
You will see the latest commit you just did (in this case text). After the pipeline has run, the yellow icon will turn green. Click on the commit and scroll until you see the title Deployed Branches.
Fig. 80 Deployed Branches#
Click on the link and admire your changes:)